The article is about how I setup Open LDAP on CentOS6 for SSH public key authentication.
1.Download and install CentOS6.2
2. CentOS configuration
Network: IP address, DNS, and restart network service
vi /etc/resolv.conf/DNS
vi /etc/sysconfig/network-scripts/ifcfg-eth0/NIC IP
vi /etc/networks//Route
/etc/init.d/network restart
configure host file
vi /etc/hostsModify 127.0.0.1 item to FQDN format because openldap get dc from the item automatically.
127.0.0.1 ldap.kzblog.comStop security services
setenforce permissive
getenforce
service iptables stop
Note: This only for the testing environment.
Update software repository, install LDAP/ssh-lpk Clients
yum -y update
yum install openldap-servers openldap-clients -y
yum install openssh-ldap nss-pam-ldapd
3. LDAP Configuration
Generate the LDAP admin password
slappasswd -s mysecret
{SSHA}cFJqdWOeG4b1p3bJFGSds5QKGw8faPd7       //copy string as password by following steps
Note: mysecret is the manage password, you will use the password for administrative commands. Displayed after the command is the corresponding hash, use the hash in further steps.
TLS settings
sed -i ‘s/dc=my-domain,dc=com/dc=kzblog,dc=com/g’ /etc/openldap/slapd.d/cn\=config/olcDatabase\=\{2\}bdb.ldifadd password and TLS settings to the file
cat <> /etc/openldap/slapd.d/cn\=config/olcDatabase\=\{2\}bdb.ldif
olcRootPW: {SSHA}cFJqdWOeG4b1p3bJFGSds5QKGw8faPd7
olcTLSCertificateFile: /etc/pki/tls/certs/slapdcert.pem
olcTLSCertificateKeyFile: /etc/pki/tls/certs/slapdkey.pem
EOF
Initialize the password for the user: “cn=admin,cn=config”
cat <> /etc/openldap/slapd.d/cn\=config/olcDatabase\=\{0\}config.ldif
olcRootPW: {SSHA}cFJqdWOeG4b1p3bJFGSds5QKGw8faPd7
EOF
Monitor configuration
sed -i ‘s/cn=manager,dc=my-domain,dc=com/cn=Manager,dc=kzblog,dc=com/g’ /etc/openldap/slapd.d/cn\=config/olcDatabase\=\{1\}monitor.ldifDB config
cp /usr/share/openldap-servers/DB_CONFIG.example /var/lib/ldap/DB_CONFIG
chown -R ldap:ldap /var/lib/ldap/
Generate SSL keys
openssl req -new -x509 -nodes -out /etc/pki/tls/certs/slapdcert.pem -keyout /etc/pki/tls/certs/slapdkey.pem -days 365
chown -Rf root.ldap /etc/pki/tls/certs/slapdcert.pem
chown -Rf root.ldap /etc/pki/tls/certs/slapdkey.pem
Schemas: Add openssh-lpk schema
cat < /etc/openldap/slapd.d/cn=config/cn=schema/cn={21}openssh-lpk.ldif
dn: cn={21}openssh-lpk
objectClass: olcSchemaConfig
cn: {21}openssh-lpk
olcAttributeTypes: {0}( 1.3.6.1.4.1.24552.500.1.1.1.13 NAME ‘sshPublicKey’ DES
C ‘MANDATORY: OpenSSH Public key’ EQUALITY octetStringMatch SYNTAX 1.3.6.1.4.
1.1466.115.121.1.40 )
olcObjectClasses: {0}( 1.3.6.1.4.1.24552.500.1.1.2.0 NAME ‘ldapPublicKey’ DESC
‘MANDATORY: OpenSSH LPK objectclass’ SUP top AUXILIARY MAY ( sshPublicKey $
uid ) )
structuralObjectClass: olcSchemaConfig
entryUUID: 135574f4-bda0-102f-9362-0b01757f31d8
creatorsName: cn=config
createTimestamp: 20110126135819Z
entryCSN: 20110126135819.712350Z#000000#000#000000
modifiersName: cn=config
modifyTimestamp: 20110126135819Z
EOF
Initialize base.ldif
e.g. : create base.ldif with following content by command: vi base.ldif :
dn: dc=kzblog,dc=com
dc: kzblog
objectClass: top
objectClass: domain
Start the services and add the entries:
service slapd start
chkconfig slapd on
ldapadd -x -W -D “cn=Manager,dc=kzblog,dc=com” -f base.ldif
ldapadd -x -W -D “cn=Manager,dc=kzblog,dc=com” -f newsudoers.ldif
Try searching to verify
ldapsearch -x -b “dc=kzblog,dc=com”
ldapsearch -H “ldap://127.0.0.1.com” -x -b “dc=kzblog,dc=com”
LDAP server configuration
authconfig –disablenis –enablemkhomedir –enableshadow –enablelocauthorize –enableldap –ldapserver=ldap://127.0.0.1 –enablemd5 –ldapbasedn=dc=kzblog,dc=com –updateallOr, you can use a curses-based application for the configuration. Enable necessary options based on the above command
authconfig-tuiNote: –enablemkhomedir is not available in authconfig-tui
Allow SSH public-key login
cat < /etc/ssh/ldap.conf
uri ldap://127.0.0.1/
base dc=kzblog,dc=com
ssl no
EOF
cat <> /etc/ssh/sshd_config AuthorizedKeysCommand /usr/libexec/openssh/ssh-ldap-wrapper AuthorizedKeysCommandRunAs nobody EOFTell the system to lookup sudoers info from ldap or files respectively
echo ‘sudoers: ldap files’ >> /etc/nsswitch.conf
cat <> /etc/nslcd.conf
ou=sudoers,dc=kzblog,dc=com
sudoers_base ou=sudoers,dc=kzblog,dc=com
EOF
Restart sshd
service sshd restart
4. LAM
LAM: ldap account manager, an excellent web-based LDAP manage tool
Install epel and start Apache
wget http://download.fedoraproject.org/pub/epel/6/i386/epel-release-6-5.noarch.rpm
rpm -ivh epel-release-6-5.noarch.rpm
service httpd start
Note: # Click this link to search a newer version when wget run failed
LAM installation
LAM is an alternative tool of phpldapadmin. You can download rpm for CentOS/fedora and install it.
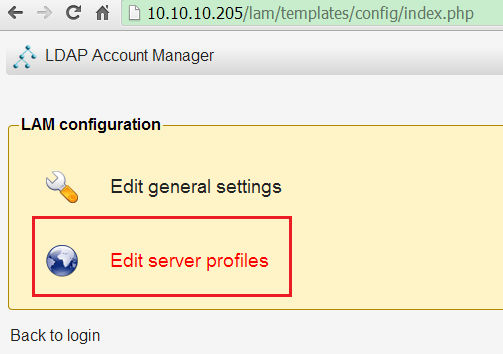
Navigate http://IP/lam/ after the installation:
![LAM]()
LAM Edit server profiles for LAM and LDAP connection
![LAM Server Setting]()
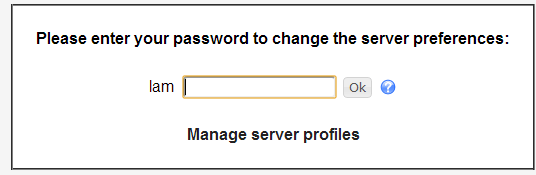
LAM Server Setting Enter LAM default password: lam, and click ‘Ok’
![LAM Password]()
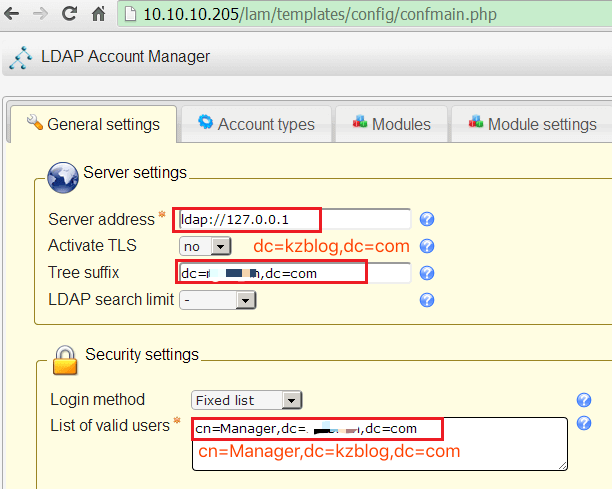
LAM Password update server address, Tree suffix, List of valid users
![General Setting]()
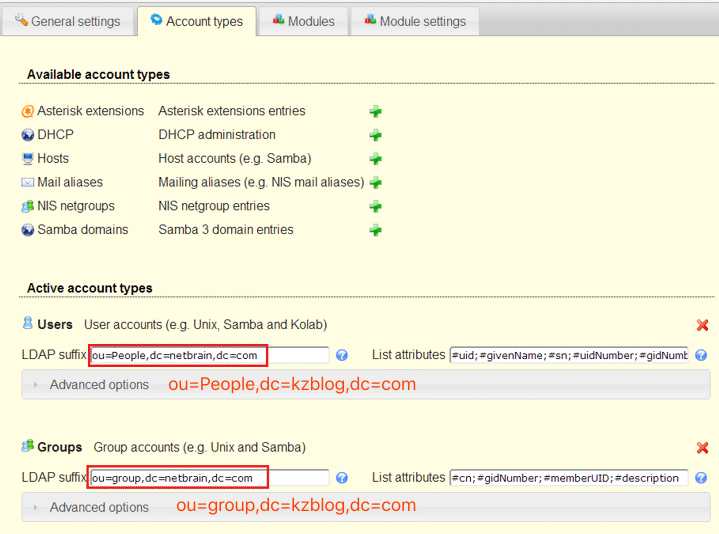
General Setting Modify LDAP suffix of Users and Groups, remove ‘Samba 3’ items from Users and Groups
Remove Hosts, Samba domain option by red ‘x’
![Account Types]()
Account Types Add ‘SSH Public Key’ to Users from Available module to extent LAM capability to manage SSH public key
![Modules]()
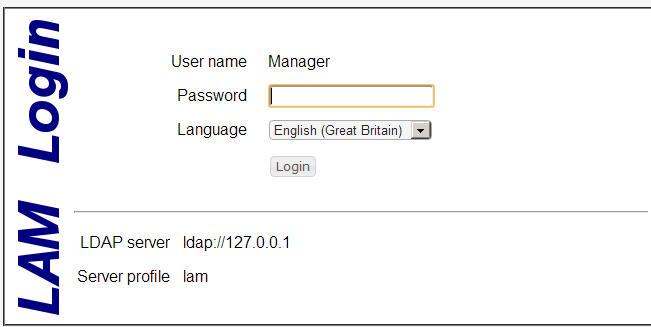
Modules Go back to login page after you click ‘Save’ button; Login by LDAP root password: mysecret
![Login again]()
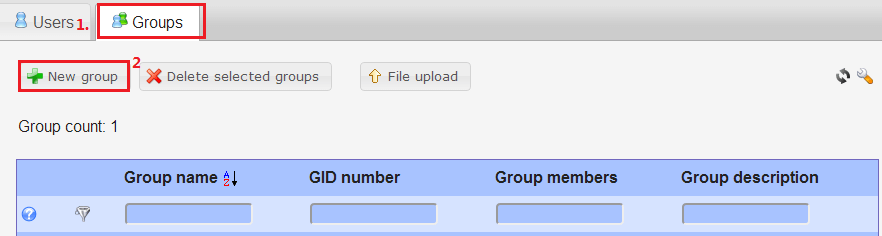
Login again Create Groups
![Add Group]()
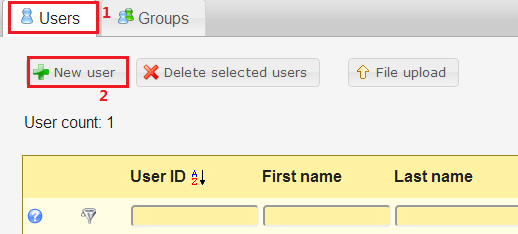
Add Group Create users
![Add User]()
Add User Public key setting in User
![Public Key]()
Public Key A sample of PuTTYGen generated key format:
—- BEGIN SSH2 PUBLIC KEY —-
Comment: “rsa-key-20121022”
AAAAB3NzaC1yc2EAAAABJQAAAIEAhGF6GIuMY8FJ1+CNApnSY1N2YSlkYz72Yvwu
a6N1nFpBklz1+dsIMg4rcTLcF34M/tW5Yz+NUDAw2AEbxQ32FPgw7sAOIXktkYOH
tr7mmimiTjkoSCrJh1kqalPSpi8rglT/Bp67Ql2SZwvUFfMzHISryR0EZC4rXP/u
vObrJe8=
—- END SSH2 PUBLIC KEY —-
Edit it and change the text to:
ssh-rsa AAAAB3NzaC1yc2EAAAABJQAAAIEAhGF6GIuMY8FJ1+CNApnSY1N2YSlkYz72Yvwua6N1nFpBklz1+dsIMg4rcTLcF34M/tW5Yz+NUDAw2AEbxQ32FPgw7sAOIXktkYOHtr7mmimiTjkoSCrJh1kqalPSpi8rglT/Bp67Ql2SZwvUFfMzHISryR0EZC4rXP/uvObrJe8=


5. Debugging
On CentOS:
more  /var/log/secure
find . –name slapd
path/slapd –V –d debuglevel
On ubuntu:
more /var/log/auth.logLDAP settings
setenforce permissive
getenforce
service iptables stop
/etc/init.d/slapd start
authconfig –disablenis –enablemkhomedir –enableshadow –enablelocauthorize –enableldap –ldapserver=ldap://127.0.0.1 –enablemd5 –ldapbasedn=dc=kzblog,dc=com –updateall
service httpd start
Note: Firewall setting only for testing environment
Others
Issue: http://bugs.debian.org/cgi-bin/bugreport.cgi?bug=432662
For error msg:
$ sudo slapindex
WARNING!
Runnig as root!
There’s a fair chance slapd will fail to start.
Check file permissions!
Start it with ‘sudo –u openldap slapindex’
Related links:
Scan the QR code using WeChat